Watercolour Cake

Hello!

Today I wanted to do something to reflect this amazing weather so I made this bright watercolour cake. Surprisingly it’s not that hard to get a pretty finish, you just have to be careful about what colours you use so they don’t all mix together. You also have to be quite careful about how much you ‘spread’ the colours, I only went round the side with my palette knife twice. I do like how it turned out, although I always forget how intense my food colourings are (I use Americolour) so next time I would do it with some softer, pastel colours!

Enjoy!

Ingredients
Your favourite layer cake-I did 4 layers of my vanilla sponge which is as follows:

  • 350g Margarine
  • 350g Caster Sugar
  • 4 Eggs
  • 350g Self Raising Flour
  • 2 tsp. Vanilla Extract

Buttercream:

  • 300g Margarine
  • 650g Icing Sugar
  • Food Colourings of your choice

Method

  1. Cream together the margarine and sugar until fluffy
  2. Gradually add the eggs/vanilla
  3. Fold in the self raising flour
  4. Pour mixture into greased tins
  5. Bake at 180 degrees for 25 minutes
  6. For the buttercream, beat the margarine for about 5 minutes
  7. Add the icing sugar in 2 batches, mixing thoroughly in between each
  8. Stack the cakes with buttercream in between each 21.jpg

9. Spread the buttercream around the edge of the cake and chill for about 10 minutes (it doesn’t have to be neat, this is just a ‘crumb coat’)

22.jpg
10. Do a second neater coat of buttercream (using palette knife and a turn table helps a lot!)
11. Colour the remaining buttercream in your chosen colours
12. Add blobs of each colour randomly around the cake (don’t be afraid to add a lot, you scrape most of it off anyway)

23.jpg
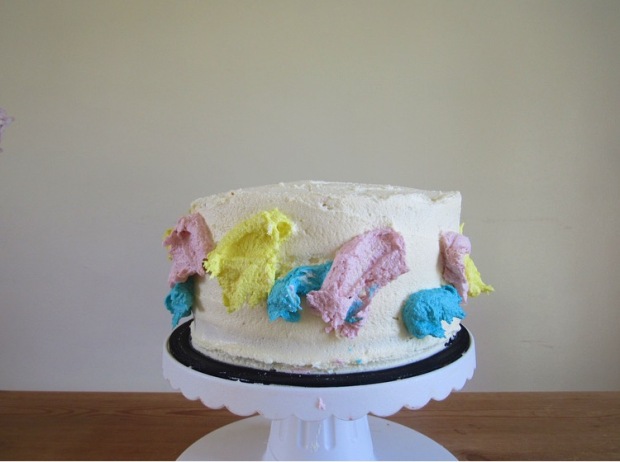
13. Using a palette knife held vertically spread the colours around the cake, carefully and lightly, add more colour if necessary. After each swipe, make sure you clean your palette knife so the colours don’t mix too much.

2426


Millionaire Cupcakes 

Hey,

Uni has been (and still is) a bit crazy at the minute with assignments and exams to revise for but I wanted to take some time to do a new recipe. I had some left over shortbread dough and didn’t want to waste it so I thought I’d add it into a cupcake again (similar to my cornflake tart cupcakes). This time though I thought I’d be a bit fancy and add chocolate and caramel to replicate a millionaire shortbread and they turned out v tasty. I went a bit over the top with the decoration but I couldn’t not add the little bronze sprinkles because they fit the ‘millionaire’ theme so well! (They look and taste just as good without them though)

Enjoy!

Ingredients:

  • Shortbread dough (first recipe on my blog)

Cupcakes:

  • 125g Caste Sugar
  • 125g Margarine
  • 3 Eggs (beaten)
  • 125g Self Raising Flour
  • 25g Cocoa Powder

Caramel Buttecream:

  • 150g Margarine
  • 350g Icing Sugar
  • 150g Caramel (I used the ready made, canned type)

Method:

  1. Roll out your shortbread and cut out 12 little circles, place them in the cupcake casesimg_2586
  2. Cream together your margarine and sugar until fluffy
  3. Slowly add your eggs bit by bit (don’t worry if it looks like it’s curdled, it’ll be fine once you add the flour)
  4. Stir in the flour/ cocoa powder
  5. Put about 2 tbsp of the mixture in each cupcake caseimg_2587
  6. Bake for 20 minutes at 180 degrees
  7. For the buttercream, cream the margarine for about 3 minutes until soft
  8. Stir in the icing sugar and beat for a further 3 minutes
  9. Add in the caramel, mix to combineimg_2585
  10. Spread the buttercream on top and decorate however you fancy (I made some little shortbread biscuits to crumble on top)

18

Nutella Bites

Hey,

As sad as it sounds, something I enjoy a bit too much is watching those facebook recipe videos. I was watching one the other day where they made Nutella Blondies and they looked incredible so I had to try something similar.

I thought it would be a good idea to bake these in muffin trays so that they were little individual ‘bites’ and I think they turned out really cute. I found a ‘blondie’ recipe online but decided that they’d taste better without the white chocolate so I guess I can’t really call them blondies..  I also altered it slightly (obviously by adding nutella) but by adding both light brown and caster sugar, this was mainly for the colour, I wanted an obvious contrast between the ‘blondie’ and the nutella. I love marble cake, so marbling the nutella seemed like a good plan, what I would say is slightly warming up your nutella helps a lot (pls remember to take off all of the foil lid before microwaving).

Overall they were a success but next time I wouldn’t bake them for as long as I did, as they turned out quite cakey- still tasty but not the gooey texture you’d expect!

Enjoy!

Ingredients:

  • 170g Butter/Margarine (melted)
  • 150g Soft Brown Sugar
  • 150g Caster Sugar
  • 2 Eggs
  • 180g Plain Flour
  • 1 tsp. Baking Powder
  • 1 tsp. Vanilla Extract
  • Nutella

Method:

  • Preheat the oven to 180 degrees
  • Mix together your butter and both sugars until combined (its easier if you have an electric/ stand mixer but by hand it fine)
  • Add the eggs one at a time, mixing well in between
  • In a separate bowl mix together your flour and baking powder
  • Sift the flour into the butter/sugar/egg mix and fold in gently
  • Add 3 tbsp. of mixture into greased (I just used some of the melted butter) muffin tin holes (or 1 tbsp. into mini muffin tin holes)
  • Add about 1 tsp. of Nutella on top of the mixture and use a knife to marble it- don’t be too heavy handed otherwise the Nutella will just mix in and you wont get the desired effect.
    8
  • I baked the larger blondies for 20 minutes and the smaller for 10 minutes, if you want a more gooey texture bake for less (just until the top is crispy).
  • Leave to cool completely in the tray before you try taking them out (this bit is quite fiddly!)910

Cornflake Tart Cupcakes

Hey!

Today was an experimental one. I came up with this idea after reminiscing over school meals and how great the puddings were. My two favourites were cornflake and butterscotch tart, I remember being SO excited when we had either of them. Thinking about them made me crave them, but you just cant buy butterscotch tart like they made it at school, so I went for a cornflake tart (and it was incred). It made me think about my blog and how I could incorporate it without just making a classic tart.

One of my favourite things to bake is cupcakes, so I thought why not try and combine the two, I wasn’t sure at all how it would turn out, but I think its been pretty successful! (At least, I think they taste great). The tart I had recently had a really hick crumbly base, more like biscuit which gave me the idea of using shortbread as the base. The jam would add colour and the cornflake would make a 10/10 topping as well as looking pretty. I love that even though its not a classic cornflake tart, it still has a traditional British feel to it and reminds me of the days back in primary school.

They do take a bit of time (because of making the shortbread as well) but its a gooden because it uses things normally found in a lot of peoples cupboards.

Enjoy!

Ingredients:

Cake:

  • 12 Shortbread Biscuits (recipe can be found on my last blog post)
  • 110g Margarine
  • 110g Caster Sugar
  • 2 Eggs
  • 110g Self Raising Flour

Buttercream:

  • 150g Margarine/Butter
  • 330g Icing Sugar
  • 2 tbsp. Milk

Topping:

  • 25g Golden Syrup
  • 25g Margarine/Butter
  • 25g Caster Sugar
  • 50g Cornflakes

You’ll also need some strawberry Jam.

Method:

  1. Start by creaming together your margarine and caster sugar
  2. Slowly add in your eggs (beaten), if it starts to separate add a bit of the flour
  3. Fold in the flour (sieved)
  4. Put a shortbread biscuit at the bottom of each cupcake case then spoon the mixture on top
  5. Bake for 20 minutes in a preheated oven of 180 degrees.
  6. While the cakes are cooking make the topping so it has time to cool down, just melt the butter, golden syrup and sugar gently on the hob, take off the heat and stir in the cornflakes.
  7. As the cakes cool make the buttercream by creaming the butter for a few minutes then adding the icing sugar in two batches beating thoroughly in between each addition. Stir in the milk.
  8. Once cooled cut a small hole in each cupcake and pipe some jam in the middle
  9. Either pipe or spoon the buttercream on top, then place about tablespoon of the cornflake mixture on top.
  10. Drizzle some more jam on top (it helps to warm up the jam slightly)

1